Custom UIViewController presentation over current context
I recently went down a rabbit hole trying to replicate the .currentContext or .overCurrentContext presentation style for a view controller using a .custom modalPresentationStyle (UIModalPresentationCurrentContext, UIModalPresentationOverCurrentContext, and UIModalPresentationStyleCustom in Objective-C). I came up with a solution that works pretty well, so I thought I’d share it here for anyone scouring the internet looking for a solution!
The setup
Let’s start with a basic setup that has a container view controller which splits its view into “top” and “bottom” controllers, with the bottom controller having definesPresentationContext set to true, and a button that presents a (translucent) child view controller over the current context:
class ContainerViewController: UIViewController {
    let topViewController = TopViewController()
    let bottomViewController = BottomViewController()

    override func viewDidLoad() {
        super.viewDidLoad()

        let topContainerView = UIView()
        topContainerView.translatesAutoresizingMaskIntoConstraints = false
        let bottomContainerView = UIView()
        bottomContainerView.translatesAutoresizingMaskIntoConstraints = false

        self.view.addSubview(topContainerView)
        self.view.addSubview(bottomContainerView)

        NSLayoutConstraint.activate([
            topContainerView.topAnchor.constraint(equalTo: self.view.topAnchor),
            topContainerView.leadingAnchor.constraint(equalTo: self.view.leadingAnchor),
            topContainerView.trailingAnchor.constraint(equalTo: self.view.trailingAnchor),
            topContainerView.bottomAnchor.constraint(equalTo: self.view.centerYAnchor),
            bottomContainerView.topAnchor.constraint(equalTo: self.view.centerYAnchor),
            bottomContainerView.leadingAnchor.constraint(equalTo: self.view.leadingAnchor),
            bottomContainerView.trailingAnchor.constraint(equalTo: self.view.trailingAnchor),
            bottomContainerView.bottomAnchor.constraint(equalTo: self.view.bottomAnchor),
        ])

        self.addChild(self.topViewController)
        topContainerView.addSubview(self.topViewController.view)
        self.topViewController.didMove(toParent: self)

        self.addChild(self.bottomViewController)
        bottomContainerView.addSubview(self.bottomViewController.view)
        self.bottomViewController.didMove(toParent: self)

        self.topViewController.view.translatesAutoresizingMaskIntoConstraints = false
        self.bottomViewController.view.translatesAutoresizingMaskIntoConstraints = false

        NSLayoutConstraint.activate([
            self.topViewController.view.topAnchor.constraint(equalTo: topContainerView.topAnchor),
            self.topViewController.view.leadingAnchor.constraint(equalTo: topContainerView.leadingAnchor),
            self.topViewController.view.trailingAnchor.constraint(equalTo: topContainerView.trailingAnchor),
            self.topViewController.view.bottomAnchor.constraint(equalTo: topContainerView.bottomAnchor),
            self.bottomViewController.view.topAnchor.constraint(equalTo: bottomContainerView.topAnchor),
            self.bottomViewController.view.leadingAnchor.constraint(equalTo: bottomContainerView.leadingAnchor),
            self.bottomViewController.view.trailingAnchor.constraint(equalTo: bottomContainerView.trailingAnchor),
            self.bottomViewController.view.bottomAnchor.constraint(equalTo: bottomContainerView.bottomAnchor)
        ])
    }
}

class TopViewController: UIViewController {
    override func viewDidLoad() {
        super.viewDidLoad()
        self.view.backgroundColor = .green
    }
}

class BottomViewController: UIViewController {
    override func viewDidLoad() {
        super.viewDidLoad()
        self.view.backgroundColor = .blue
        self.definesPresentationContext = true

        let button = UIButton(
            primaryAction: UIAction { [weak self] _ in
                self?.presentChild()
            }
        )
        button.translatesAutoresizingMaskIntoConstraints = false
        button.setTitle("Present", for: .normal)
        button.setTitleColor(.label, for: .normal)
        self.view.addSubview(button)

        NSLayoutConstraint.activate([
            button.topAnchor.constraint(equalTo: self.view.topAnchor),
            button.leadingAnchor.constraint(equalTo: self.view.leadingAnchor),
            button.trailingAnchor.constraint(equalTo: self.view.trailingAnchor),
            button.bottomAnchor.constraint(equalTo: self.view.bottomAnchor)
        ])
    }

    func presentChild() {
        let presentedViewController = PresentedViewController()
        presentedViewController.modalPresentationStyle = .overCurrentContext
        self.present(presentedViewController, animated: true)
    }
}

class PresentedViewController: UIViewController {
    override func viewDidLoad() {
        super.viewDidLoad()
        self.view.backgroundColor = .red.withAlphaComponent(0.5)
    }
}
This gives us the UI shown below:

The first attempt
Now, suppose we wanted to customize the presentation here to, say, show a dimming view behind the view controller and present the child over only half the container. Our first attempt might be to set modalPresentationStyle to .custom and implement a custom UIPresentationController. Most of the functionality can be achieved by following the Apple docs. First, implement the UIPresentationController subclass:
extension PresentedViewController {
    class PresentationController: UIPresentationController {
        let dimmingView: UIView = {
            let view = UIView(frame: .zero)
            view.translatesAutoresizingMaskIntoConstraints = false
            view.backgroundColor = .black
            view.alpha = 0.0

            return view
        }()

        override var frameOfPresentedViewInContainerView: CGRect {
            guard let containerView = containerView else { return .zero }
            return CGRect(
                x: 0.0,
                y: containerView.bounds.midY,
                width: containerView.bounds.width,
                height: containerView.bounds.height / 2.0
            )
        }

        override func presentationTransitionWillBegin() {
            let containerView = self.containerView!

            if let presentedView = self.presentedView {
                containerView.insertSubview(self.dimmingView, belowSubview: presentedView)
            } else {
                containerView.addSubview(self.dimmingView)
            }

            self.dimmingView.frame = containerView.bounds

            if let coordinator = self.presentedViewController.transitionCoordinator {
                coordinator.animate { _ in
                    self.dimmingView.alpha = 0.5
                }
            } else {
                self.dimmingView.alpha = 0.5
            }
        }

        override func presentationTransitionDidEnd(_ completed: Bool) {
            if completed == false {
                self.dimmingView.removeFromSuperview()
            }
        }

        override func dismissalTransitionWillBegin() {
            if let coordinator = self.presentedViewController.transitionCoordinator {
                coordinator.animate { _ in
                    self.dimmingView.alpha = 0.0
                }
            } else {
                self.dimmingView.alpha = 0.0
            }
        }

        override func dismissalTransitionDidEnd(_ completed: Bool) {
            self.dimmingView.removeFromSuperview()
        }
    }
}
Next, implement the presentationController(forPresented:presenting:source:) method from UIViewControllerTransitioningDelegate and return our custom presentation controller:
extension PresentedViewController: UIViewControllerTransitioningDelegate {
    func presentationController(
        forPresented presented: UIViewController,
        presenting: UIViewController?,
        source: UIViewController
    ) -> UIPresentationController? {
        return PresentationController(presentedViewController: presented, presenting: presenting)
    }
}
Finally, update BottomViewController.presentChild to use our custom presentation:
func presentChild() {
    let presentedViewController = PresentedViewController()
    presentedViewController.modalPresentationStyle = .custom
    presentedViewController.transitioningDelegate = presentedViewController
    self.present(presentedViewController, animated: true)
}
Now, build and run the app, hit the “Present” button, and…

Uh oh! By changing the presentedViewController.modalPresentationStyle to .custom, we’ve lost the .overCurrentContext behavior that confined the presentation to the bottom container, so UIKit is presenting the PresentedViewController over the entire screen. Looks like we’ll have to try something different…
UIPresentationController.shouldPresentInFullscreen to the rescue… or not
Reading the docs for UIPresentationController, you might find shouldPresentInFullscreen and think that the description matches exactly what we’re trying to do:
The default implementation of this method returns
true, indicating that the presentation covers the entire screen. You can override this method and returnfalseto force the presentation to display only in the current context.
That sounds great, but if we override the method like it says and return false, we get the exact same behavior as before:
There are countless questions online from engineers who are similarly confused about the utility of shouldPresentInFullscreen, but I haven’t seen any clear answers. As of iOS 14, it’s still not apparent to me what this property does. If you know, send me an email and I can update this post if it solves some of our problems!
Calculating the frame ourselves
We might not be able to automatically achieve the current context presentation, but UIPresentationController gives us a lot of flexibility. Notably, we have complete control over frameOfPresentedViewInContainerView and the layout of any custom views (such as dimmerView), so it shouldn’t be too difficult to do our own calculations.
The first step is to make sure that our PresentationController has access to the appropriate presentation context. Let’s add a property and a new initializer to PresentationController:
let contextViewController: UIViewController

init(presentedViewController: UIViewController, presenting: UIViewController?, context: UIViewController) {
    self.contextViewController = context
    super.init(presentedViewController: presentedViewController, presenting: presenting)
}
Now, update the implementation for frameOfPresentedViewInContainerView to use the bounds of the contextViewController instead of the containerView:
override var frameOfPresentedViewInContainerView: CGRect {
    guard let containerView = containerView else { return .zero }

    let contextBounds = self.contextViewController.view.convert(
        self.contextViewController.view.bounds,
        to: containerView
    )
    return CGRect(
        x: 0.0,
        y: contextBounds.midY,
        width: contextBounds.width,
        height: contextBounds.height / 2.0
    )
}
Similarly, make sure we update the frame of PresentationController.dimmingView to confine it to the bounds of the context (not the entire containerView) in presentationTransitionWillBegin:
self.dimmingView.frame = self.contextViewController.view.convert(
    self.contextViewController.view.bounds,
    to: containerView
)
Lastly, we have to make sure that we update PresentedViewController.presentationController(forPresented:presenting:source:) to properly pass the context to PresentationController.init:
func presentationController(
    forPresented presented: UIViewController,
    presenting: UIViewController?,
    source: UIViewController
) -> UIPresentationController? {
    var context = source

    while !context.definesPresentationContext,
          let parent = context.parent {
        context = parent
    }

    return PresentationController(
        presentedViewController: presented,
        presenting: presenting,
        context: context
    )
}
Note that in this method, source is the view controller on which the programmer originally called present(_:animated:completion:), which in our case is BottomViewController. Since we know that BottomViewController.definesPresentationContext is true, we could have just passed source in for context directly and gotten the same behavior. However, in the interest of more closely replicating the behavior of .currentContext and .overCurrentContext, this implementation walks up the parent chain to find the first parent above source which defines the presentation context, using the window’s root view controller if nothing else is found.
Now, when we present our view controller:
Success! That’s exactly the outcome we wanted.
Or is it?
As it turns out, this approach has one more puzzle piece missing, which might not be immediately apparent. To illustrate the problem, let’s add an interactive element to the top view controller:
class TopViewController: UIViewController {
    override func viewDidLoad() {
        super.viewDidLoad()
        self.view.backgroundColor = .green

        let slider = UISlider(frame: .zero)
        slider.translatesAutoresizingMaskIntoConstraints = false

        self.view.addSubview(slider)
        NSLayoutConstraint.activate([
            slider.leadingAnchor.constraint(equalTo: self.view.leadingAnchor),
            slider.trailingAnchor.constraint(equalTo: self.view.trailingAnchor),
            slider.centerYAnchor.constraint(equalTo: self.view.centerYAnchor)
        ])
    }
}
If we run the app, the issue becomes clear once we proceed with the custom presentation:
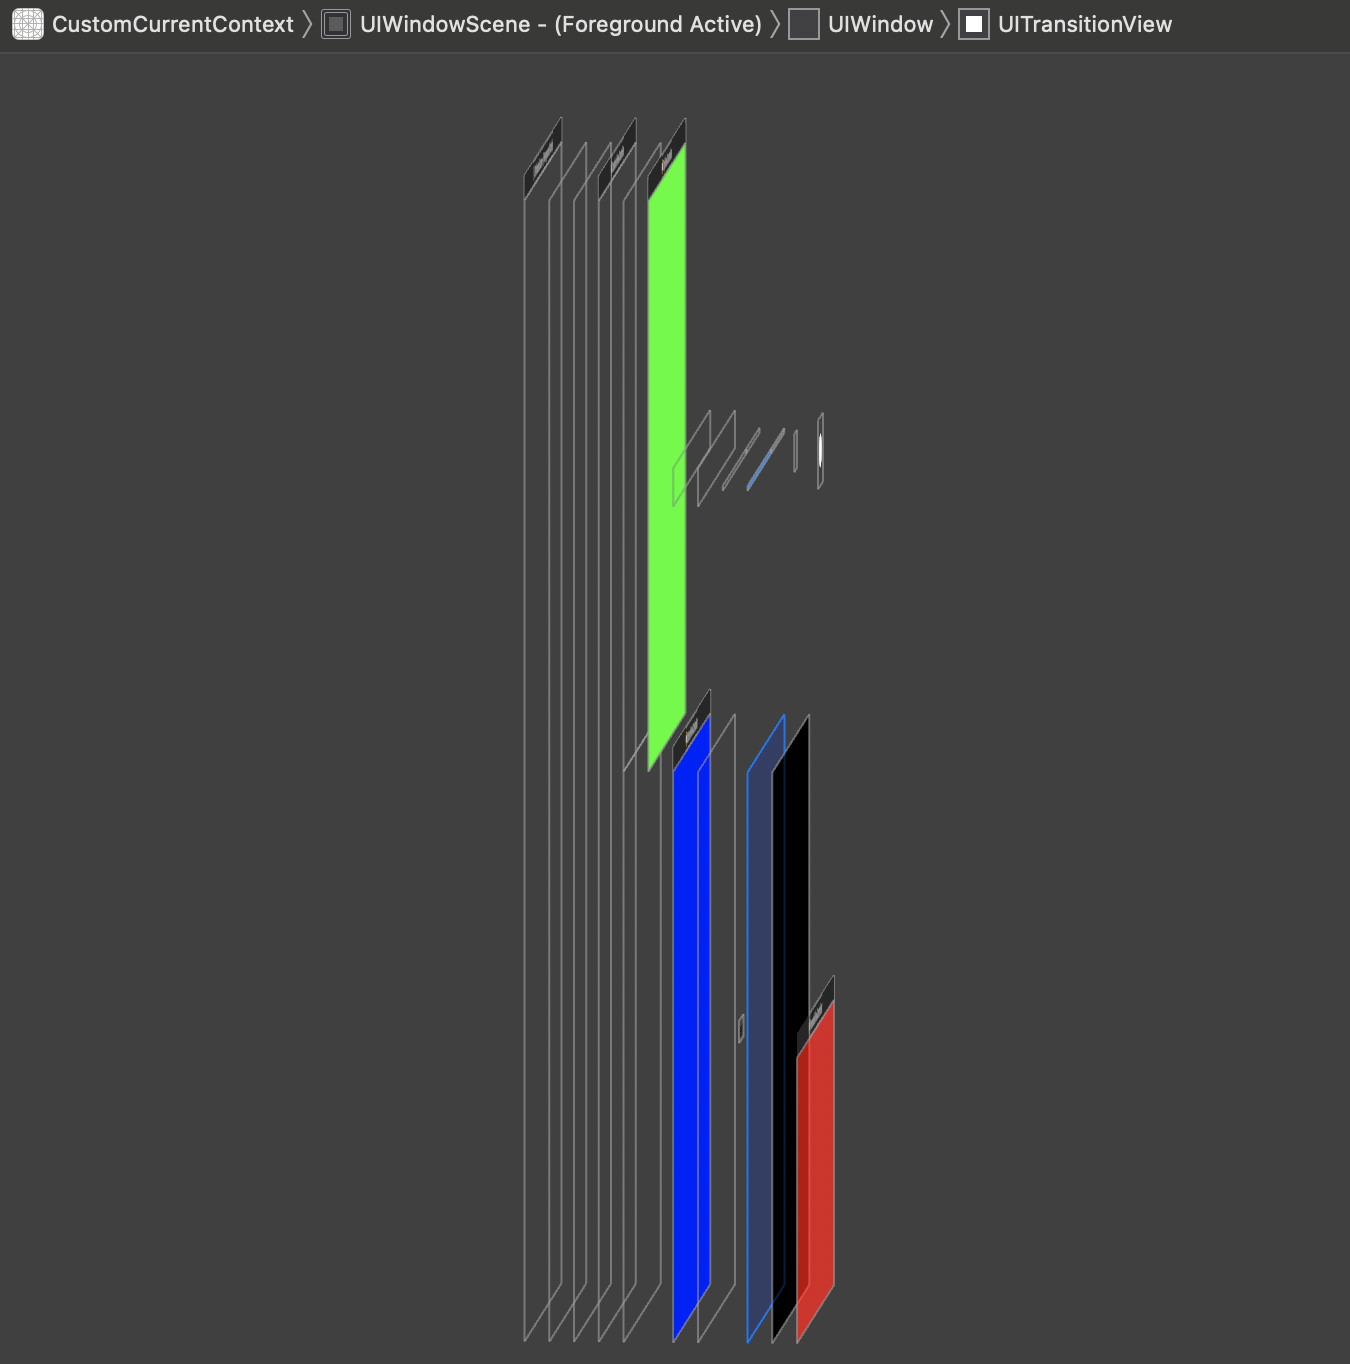
A quick dip into the “Debug View Hierarchy” tool immediately reveals the root cause:
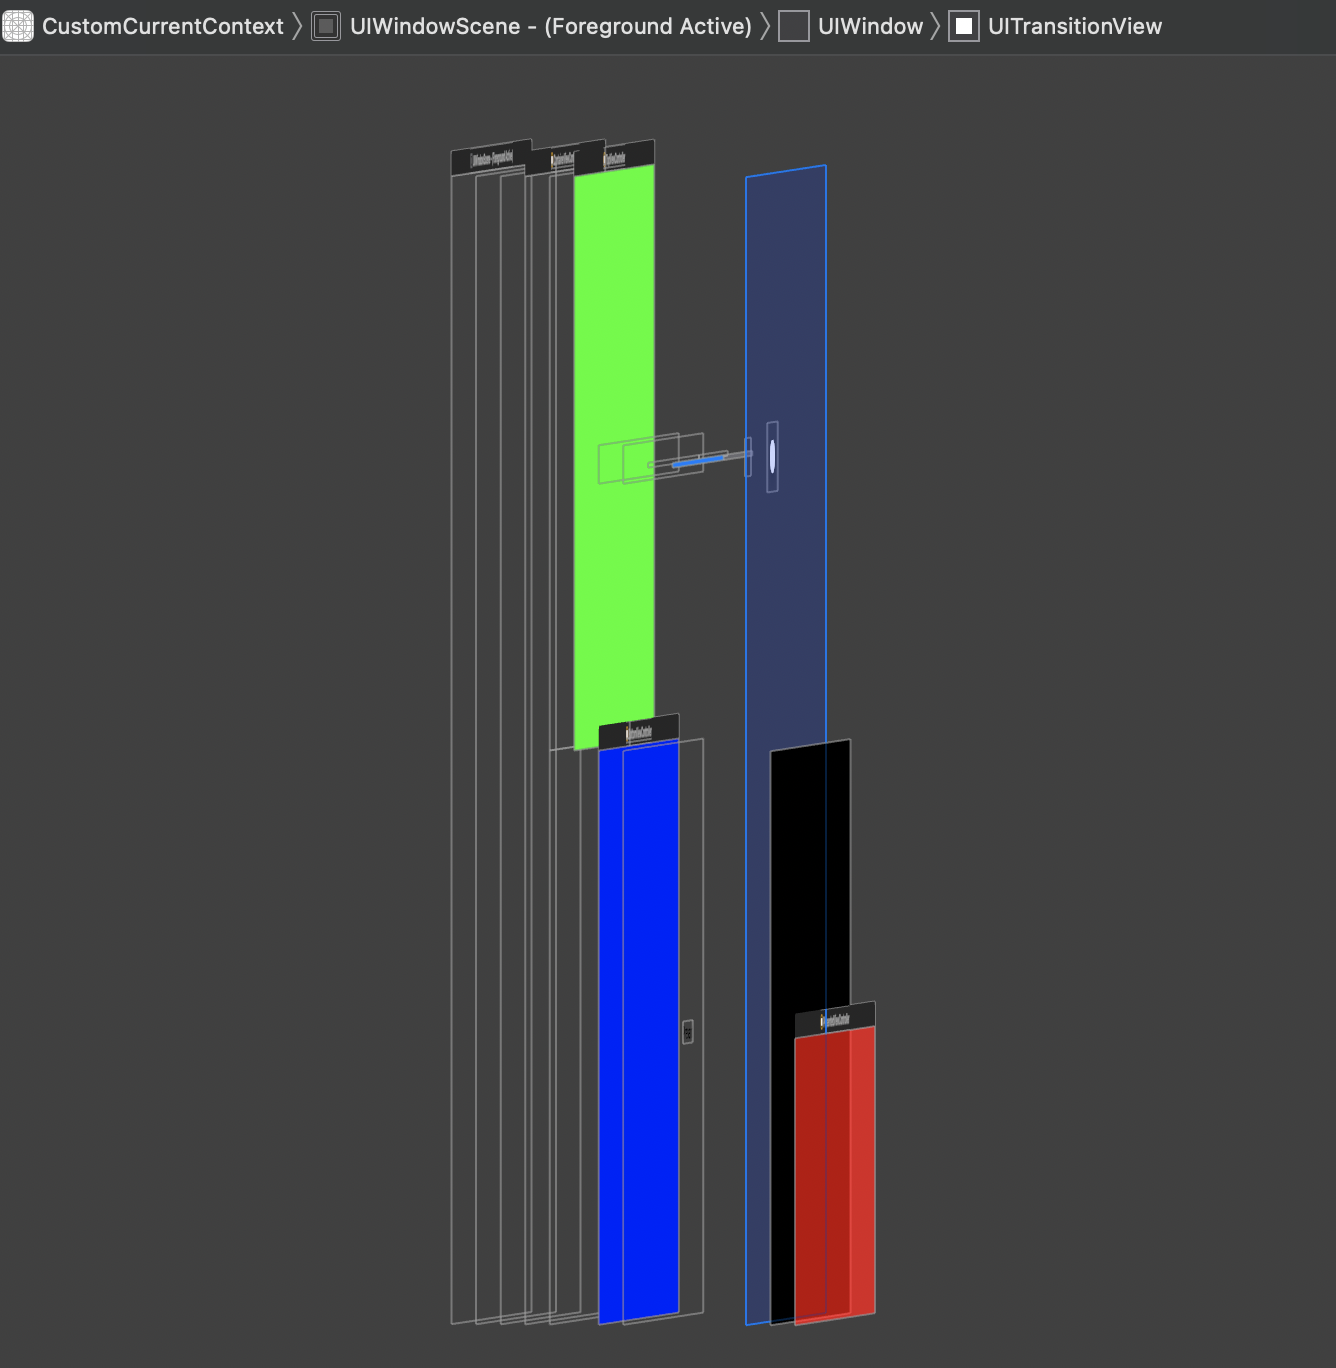
We carefully adjusted the frames of the dimmingView and the presentedViewController, but the UIKit-controlled containerView is still covering the entire screen. This means that while the view controller is presented, the containerView will intercept all the touch events destined for outside the presentation context.
I haven’t come up with a perfect solution for this, but I have a few approaches that can alleviate this problem.
1. Custom dismissal gesture
This approach is probably the least fragile, in that it won’t rely on any private or undocumented features, but it also doesn’t achieve the best user experience. The basic idea is to introduce another custom view to our presentation hierarchy that will allow us to intercept and respond to touches that occur outside the container. That looks something like this:
First, introduce a new backgroundButton property to PresentationController:
let backgroundButton: UIButton = {
    let button = UIButton(frame: .zero)
    button.translatesAutoresizingMaskIntoConstraints = false

    return button
}()
Next, add a function to PresentationController that will be called when the backgroundButton receives a touch. We could do a number of things in here, but for now we will just dismiss the presented view controller:
@objc func backgroundButtonTapped() {
    self.presentedViewController.dismiss(animated: true)
}
Finally, in PresentationController.presentationTransitionWillBegin, add the background button to the hierarchy, have it fill the container, and set the target and action appropriately:
containerView.insertSubview(self.backgroundButton, belowSubview: self.dimmingView)
self.backgroundButton.frame = containerView.bounds
self.backgroundButton.addTarget(
    self,
    action: #selector(backgroundButtonTapped),
    for: .touchDown
)
In our case, we have the view controller get dismissed on .touchDown, but obviously other control events could be used here as well. You could even set up a gesture recognizer using this approach if you needed more precise control over when to trigger backgroundButtonTapped:
Looks pretty good! The downside of this approach is that it still keeps the user from interacting with any content outside the presentation context while the view controller is presented, so it’s not a total replacement for .overCurrentContext or .currentContext functionality-wise.
2. Getting swizzly
As with any blog post on a UIKit issue, there must be one solution that uses swizzling. While some people are hesitant to introduce any use of swizzling to their codebase (with good reason!) it can be a powerful tool if used sparingly and carefully.
Full disclosure: swizzling can be dangerous! I’m not even completely confident that the swizzling as performed in this blog post is one hundred percent correct. There are libraries out there that can be used to make swizzling more ergonomic, but if you’re not totally confident in what you’re doing then swizzling may not be the best approach.
In this case, we’ll be swizzling the UIView.hitTest(_:with:) method of containerView to cause touches to pass “through” the container view when no other view is hit. The modifications will start from the project state before the changes in Custom dismissal gesture, so revert those changes before proceeding if you’re coding along.
To do the heavy lifting, we define a top-level function called swizzleHitTest that takes in a UIView and swaps out the hitTest method with our replacement logic:
private func swizzleHitTest(for view: UIView) {
    // Retrieve the original `viewDidAppear` method and implementation for this view controller.
    guard let method = class_getInstanceMethod(type(of: view), .hitTest) else { return }
    let originalImp = method_getImplementation(method)

    // Create the new `IMP`
    let newImp = imp_implementationWithBlock({ _self, point, event in // swiftlint:disable:this identifier_name
        // An `IMP` is just a C function pointer where the first two args are `self` and `_cmd`.
        let originalImpFunc = unsafeBitCast(
            originalImp,
            to: (@convention(c) (Any, Selector, CGPoint, UIEvent?) -> UIView?).self
        )

        // Call the original implementation.
        let hitView = originalImpFunc(_self, .hitTest, point, event)

        // If we didn't hit a subview, then pretend we didn't hit anything.
        if hitView === (_self as? UIView) {
            return nil
        } else {
            // Otherwise, return the subview that was hit.
            return hitView
        }

    // `imp_implementationWithBlock` does not provide the block with a `_cmd` parameter.
    } as @convention(block) (Any, CGPoint, UIEvent?) -> UIView?)

    // Actually do the swizzle!
    method_setImplementation(method, newImp)
}

private extension Selector {
    static let hitTest = #selector(UIView.hitTest(_:with:))
}
A lot of this is just boilerplate to set up the swizzle, but the meat of the implementation is in these lines:
// Call the original implementation.
let hitView = originalImpFunc(_self, .hitTest, point, event)

// If we didn't hit a subview, then pretend we didn't hit anything.
if hitView === (_self as? UIView) {
    return nil
} else {
    // Otherwise, return the subview that was hit.
    return hitView
}
We begin by accessing the hitView returned by the original implementation. This represents the subview of _self (or perhaps _self itself) that was “hit” by a touch at the location point. If hitView was the view itself, that means no subview was hit. In that case, we return nil to pretend as though no view was hit at all, so that UIKit will continue traversing the view hierarchy looking for views underneath _self that are willing to receive the touch.
With this function defined, now all we have to do is add the following line to presentationTransitionWillBegin:
swizzleHitTest(for: containerView)
Let’s give it a try:
Awesome! We can now interact with content outside of the presentation context without the view controller getting dismissed.
For those that aren’t comfortable with swizzling or just want to avoid it, though, I do have one last approach.
3. Poking the containerView’s frame
Again, we’re starting over from the project state before we made any changes for the Custom dismissal gesture or Getting swizzly sections. This is the simplest of the three approaches, but it also makes me the most uneasy, since it’s not clear that this usage of the APIs is supported. Use it at your own risk!
The basic idea is that rather than let the containerView fill the entire window and position the dimmingView and presented view within it according to the presentation context, we will just adjust the frame of the containerView based on the presentation context. In presentationTransitionWillBegin, we add the following line immediately after initializing containerView:
containerView.frame = self.contextViewController.view.convert(
    self.contextViewController.view.bounds,
    to: containerView.superview
)
and below, we update the line where we set self.dimmingView.frame:
self.dimmingView.frame = containerView.bounds
Finally, we revert the implementation of frameOfPresentedViewInContainerView to what we had in The first attempt above:
override var frameOfPresentedViewInContainerView: CGRect {
    guard let containerView = containerView else { return .zero }
    return CGRect(
        x: 0.0,
        y: containerView.bounds.midY,
        width: containerView.bounds.width,
        height: containerView.bounds.height / 2.0
    )
}
Running this version, we get the same behavior as in Getting swizzly above. Interaction with the top view controller is permitted while the presented view controller covers the bottom context.
If we open up “Debug View Hierarchy” one last time, we can see the difference from our first approach.
Now, the UITransitionView that contains our presented view controller only covers the presentation context defined by the BottomViewController.
Disclaimer
The biggest downside to all these approaches (and the root cause of all our issues) is that the presentingViewController is not BottomViewController, but ContainerViewController. This means that we would have issues using this custom “current context” presentation in multiple branches of a view controller hierarchy at the same time, since we’d end up trying to present two view controllers on top of the top container at once.
If you have any suggestions about better ways to achieve this effect, please reach out and I will add them to this post!
4. (Addendum) Using an intermediate presentation
Of course, after publishing I stumbled upon yet another approach that is similarly promising. It requires a bit more setup work, but it avoids the issuse mentioned above about presentingViewController.
I was tipped onto this approach by this StackOverflow answer on a question about shouldPresentInFullscreen. The short version: it seems that while shouldPresentInFullscreen won’t work if the custom presention is for the view controller directly presented on the view controller that defined the presentation context, it will have an effect if the custom presentation is taking place over another view controller that is presented in the context. Let’s take a closer look.
We will begin from the project state in The first attempt, with our presentation that covered the entire screen. The high level approach we will be taking is to have a view controller that sits in between BottomViewController and PresentedViewController in order to force the latter to be presented within the context of BottomViewController.
First, we will do what the documentation for shouldPresentInFullscreen suggests and override the property in PresentationController to return false:
override var shouldPresentInFullscreen: Bool { false }
Next, will define PresentationHelper, the view controller which will sit in between BottomViewController and PresentedViewController:
class PresentationHelper: UIViewController {
    override func viewDidAppear(_ animated: Bool) {
        let viewController = PresentedViewController()
        viewController.modalPresentationStyle = .custom
        viewController.transitioningDelegate = viewController
        self.present(viewController, animated: true)
    }
}
The idea here is to present the actual destination view controller as soon as our PresentationHelper appears. Now, all we have to do is update the implementation of BottomViewController.presentChild:
func presentChild() {
    let helperViewController = PresentationHelper()
    helperViewController.modalPresentationStyle = .overCurrentContext
    self.present(helperViewController, animated: false)
}
Here, we make sure to present the PresentationHelper unanimated, since its own viewWillAppear method takes care of performing the PresentedViewController presentation in an animated fashion. Since the PresentationHelper is invisible, presenting it in an animated fashion would just appear to the user as a breif delay before presenting the PresentedViewController.
And… that’s it! Build and run and you should see the desired presentation behavior:

The last bit of housekeeping you’ll need to handle is to make sure that you clean up the PresentationHelper on the dismissal end, but exactly how you do this will depend on your particular presentation setup. I opted to add the following line to PresentationController.dismissalTransitionDidEnd(_:):
self.presentingViewController.dismiss(animated: false)
This ensures that once the PresentedViewController finishes its dismissal, we will immediately dismiss the PresentationHelper as well. If we didn’t then the transparent view would stick around and block all interaction with the BottomViewController.